Thursday, January 20, 2011
Increase Hard Disk speed in Windows
If you like to increase/optimize your Hard Disk I/O - read/write speed without buying expensive software utilities to do that job or changing the HD, just follow next steps. With doing these steps you will increase Hard disk speed (depends of manufacture and specification, but its worth to try). The most speed improvement is visible with IDE drives; however there are reports that this tweak also does good for SCSI disks.
In any case, it won't harm your system, so try it yourself and let me know what you find!
Steps:
1. Run SYSEDIT.EXE from the start & then Run command.
2. Expand the system.ini file window.
3. Scroll down almost to the end of the file untill you find a line called [386enh].
4. Press Enter to make one blank line, and in that line type
5. Irq14=4096 (note: This line IS CASE SENSITIVE)
6. Click on the File menu, then choose Save.
7. Close SYSEDIT and reboot your computer.
8. Restart windows!
The speed improvement will be noticed just after the system reboots, any system info. software can be used to check the improvement.
Disabling Msn Messenger At Startup
It is quite irritating that MSN Messenger pops up every time you start windows.To disable Messenger MSN from running at startup, try the following :
(1) Go to the start menu >> RUN >> type "regedit" >> Press enter.
(2) The Registry editor will now have opened. Navigate to the following Key:
HKEY_LOCAL_MACHINE\Software\Policies\Microsoft
(3) Now create a new key by selecting Edit from the main menu bar. Now select New then Key. Name this new Key: Messenger .
(4) Now select the newly created Messenger Key and create another new Key. Only this time we are going to name it: Client
(5) Next we have to create a DWORD value. So Right Click the new Client Key and select New then DWORD.
Name the DWORD PreventRun
Set's it Data Value to 1.
Now restart Windows XP and you will have successfully Disabled Messenger MSN.
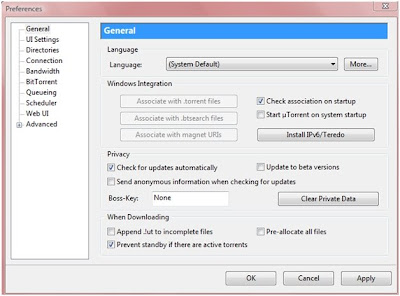
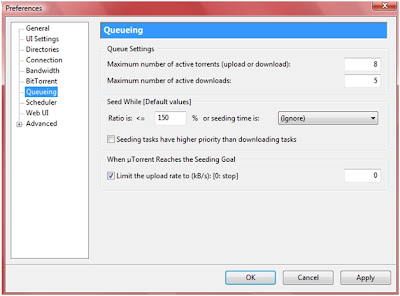
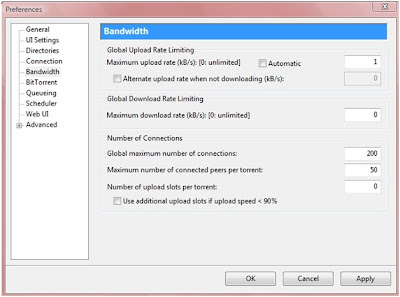
Configuring BitTorrent ot MuTorrent To Get Fast Downloading Speed.
Normally when downloading torrents through torrent clients (Mu torrent etc) one does not get good downloading speeds and it becomes very annoying especially on slow internet connections. Actually it is not the software or torrents at fault but the default settings of MuTorrent (Or BitTorrent) are the culprits. When you download a torrent it is not only downloaded but also uploaded at the same time (Actually it is “Sharing”). Thus uploading also take your bandwidth reducing downloading speeds. By tweaking some settings you can reduce uploading speeds and increase downloading speed. Just follow the below given instructions:
1. Launch Mu Torrent and go to “Options/Preferences” (Or simply press Ctrl+P keys)
1. Launch Mu Torrent and go to “Options/Preferences” (Or simply press Ctrl+P keys)
2. Change the default settings according to the below given snapshots i.e. the settings must be changed exactly as in the pictures below.
Installing and configuring a Wireless Router
A wireless router affords laptop or portable computer users greater mobility in their homes and businesses. In most home networks, wireless routers are connected to a cable or DSL modem, and the router sends the signals and information that make up an Internet protocol (IP) thread to the user's computer via radio signals rather than wires.To communicate with the wireless router, individual computers house transceivers such as an internal expansion card, a peripheral docked by USB or, in the case of laptops, a PC card or hard-wired internal device. For those accessing the Internet through a high-speed connection, a wireless router can also serve as a hardware firewall (as opposed to a software program), enabling protection from undesirable outside computers without exhausting as many system resources as traditional firewall programs.
Installing a Wireless Router
First, turn off the PC and modem, then remove the Ethernet cable from the PC and plug it into the router's WAN port. Install a second Ethernet cable between the PC's Ethernet port and one of the router's Ethernet ports. Power the modem, router and then PC, waiting for the system to boot and initialize before attempting an Internet connection.
Most routers are programmed with the manufacturer's default settings, including the network's name or service set identifier (SSID), channel and sign-on password. These default settings generally may be changed using included software or an online setup utility provided by the router's manufacturer.
Configure the router by entering the router configuration IP address at the URL provided, followed by the configuration utility ID and the default password. To find your router's default IP address and the default login info, refer to the owner's manual. If you own a Linksys router, a popular brand, the IP address is usually 192.168.1.1. Two other popular brands, D-Link and Netgear, generally use 192.168.0.1
Connecting a Printer to a Wireless Router
First, check the documentation that came with your printer to determine how it's designed to connect to computers. Connections made through Ethernet, USB and (obsolescent) parallel ports are common, but newer printers are sometimes wireless-enabled and allow you to simply add them to your wireless network.
Refer to the owner's manual for your particular wireless router. Inside, find the default IP address and the default login info. If you own a Linksys router, the IP address is usually 192.168.1.1. Other popular brands D-Link and Netgear generally use 192.168.0.1.
How to open office 2007 files into Office 2003
Today tip will help you to resolve the compatibility issues between the Office 2003 and Office 2007. Because all programs in office 2003 used the old file extensions for its different programs. For example Word 2003 saved files with extension .doc, Excel 2003 with .xls and PowerPoint with .ppt. but on the other office 2007 used the new file extensions for its different programs. For example Word 2007 saved files with extension .docx, Excel 2007 with .xlsx and PowerPoint with .pptx. Now the problem is that when you will try to open office 2007 files into office 2003 and you will not open the file due to compatibility issues between both office versions. Microsoft provides a free compatibility pack to convert office 2007 documents to the office 2003 format. There are many third party free converter are available but here we are using Microsoft office compatibility pack.
Follow the given steps to download free Microsoft compatibility pack and install it.
To use this feature, you will need to be logged into your computer with administrative rights.
Visit the following link to download the Microsoft compatibility pack:
http://www.microsoft.com/downloads/details.aspx?FamilyId=941b3470-3ae9-4aee-8f43-c6bb74cd1466&displaylang=en
How to access the sharing data offline
- Access the shared data offline allows you to keep using your shared files, folders and software programs when disconnected from the data server. When you reconnect to your data server, all files will be synchronized to the files on the network.There are two types of configurations required to set the access shared folders offline available, one for data server and other for client computer.Configuration on Data Server.
First locate the folders that you would like to share or make new folders then share these folders so they can be accessible to any one on the network.Now right click on that folder and click on the option "Sharing and security".A small dialog box will appear with the title "data properties". Under the "Sharing" tab, select the check box "Share this folder on the network" under the "Network sharing and security".
Now set the share level permissions that you want to give the users on every folder. Enable cache of share folders by click on cache button (by default it will be enabled).
Configuration on Client ComputerOn the client computer, first open My Computer then click on Tools.In Tools menu bar, click on Folder Options, a window will appear with the title Folder Options.Under the Offline File tab, check the option Enable Offline File. Here you can choose the synchronization process "Synchronize all offline files when logging on", "Synchronize all offline files before logging off" and others.
Click on Apply button to save the settings and then Ok button to close this window.Now sitting on the client computer, try to access the shared folder from the data server.First Right click on the shared folder and Click on Make available offline.To synchronizing the offline work from client computer to data server, again open My Computer then click on Tools. Click on Synchronize then click on synchronizing button.After that down to data server and then try to access share folders by give the UNC (Universal Naming Convention) path of data server. But it will be accessible weather the server is down or up.
Boot Or Start Computer Faster
Many computers take a lot of time to boot (or start ).This is due to many reasons.
Some slight changes can do wonders for your system:
1. Press start->run then type msconfig and press enter.
Go to the startup tab. Here you will see a list of startup items. These are all the programs that automatically start when you boot your PC. It is these that slow down the boot up process.
So uncheck all the unwanted items like ms-office, messengers other utilities that u may not need at startup). Don't uncheck your antivirus software.
Restart your Pc to and see for yourself, your pc will now boot faster....
2. A great new feature in Microsoft Windows XP is the ability to do a boot defragment. This places all boot files next to each other on the disk to allow for faster booting. By default this option is enabled, but on some systems it is not, so below is the information on how to turn it on:
Go to Start Menu and Click Run
Type in regedit then click ok
Find "HKEY_LOCAL_MACHINE\SOFTWARE\Microsoft\Dfrg\BootOpt imizeFunction"
Select "Enable" from the list on the right
Right on it and select "Modify"
Change the value to Y .
Reboot your Pc and see the change yourself.
3.SPEED UP BOOT BY DISABLING UNUSED PORTS.!!
You may have tried many tweaks like modifying windows XP start-up applications, prefetches, unload DLLs method, etc. And yes those methods do work for me.
I have just accidentally found out another way to give you an extra boost in windows XP's boot performance. This is done by disabling your unused devices in Device Manager. for example, if you don't have input devices that are connected to one of your USB's or COM ports, disabling them will give you an extra performance boost in booting. Go to Control Panel -> System -> Hardware tab -> device manager Disable devices that you don't use for your PC and then
Gmail Drive guide to use Gmail space as online storage drive hack

Gmail is really famous among users of all the email clients available on the web and that is not because it has a cool interface rather it is famous for its reliability and huge space which includes storage space of 6000 megabytes and increasing. Google doesn’t stop here and recently Google announced that users can now buy more online storage for Google services just by paying a little amount. So why not use this online storage space and use it externally probably as a network drive or one of your own computer hard drives.
Use Google Storage Space as Google Drive
I am going to show different methods by which your can use your Gmail account space as your external hard drive that too free. You will be able to download (or should I say copy) attachments from your Gmail account to your computer just as you would do from a drive on your computer. You can also use this space to upload content direct from your computer and save it online in your Gmail account.
1. GMAIL DRIVE

GMail Drive is a Shell Namespace Extension that creates a virtual filesystem around your Google Mail account, allowing you to use Gmail as a storage medium.
GMail Drive creates a virtual filesystem on top of your Google Gmail account and enables you to save and retrieve files stored on your Gmail account directly from inside Windows Explorer. GMail Drive literally adds a new drive to your computer under the My Computer folder, where you can create new folders, copy and drag’n'drop files to.
With GMail Drive you can easily copy files to your Google Mail Account and retrieve them again.
When you create a new file using GMail Drive, it generates an e-mail and posts it to your account. The e-mail appears in your normal Inbox folder, and the file is attached as an e-mail attachment. GMail Drive periodically checks your mail account (using the Gmail search function) to see if new files have arrived and to rebuild the directory structures. But basically GMail Drive acts as any other hard-drive installed on your computer.
You can copy files to and from the GMail Drive folder simply by using drag’n'drop like you’re used to with the normal Explorer folders.
Because the Gmail files will clutter up your Inbox folder, you may wish to create a filter in Gmail to automatically move the files (prefixed with the GMAILFS letters in the subject) to your archived mail folder.
Please note that GMail Drive is still an experimental tool. There’s still a number of limitations of the file-system (such as total filename size must be less than 65 characters). Since the tool hooks up with the free Gmail Service provided by Google, changes in the Gmail system may break the tool’s ability to function. I cannot guarantee that files stored in this manner will be accessible in the future.
Download
2. PHP GMAIL DRIVE (PGD)
 Php Gmail Drive is a new type of file sharing utility. Unlike typical file servers (say xDrive) it uses Gmail as backend file server. You can enjoy it simply by hosting a small PHP script in your web site without any database. Gmail file space is more than 2GB, so you can imagine you already have such a big space on internet. However, you will require a Gmail account (If you don’t have any Gmail address, go GmailSwap or ask your friends.). PGD automatically connects Gmail server and fetches list of all attached files and generate downloadable links in a tree like view. If you are looking for a file server to upload your music or notes without any hassle, PGD is ideal for you. Technically speaking PGD is wrapper of Gmailer . Thought there is no need to know hecks of PHP or Gmailer. Just you have to check that your PHP hosting service provider has curl extension of PHP to handle HTTP/HTTPS traffic.
Features
* Successfully connects to Gmail and only grabs list of Attachments in Gmail messages.
* List of attachments are displayed with inbuilt Javascript engine. You can customize output to any other formats.
* 100% compliant to GMAILFS. So you can upload with Windows Gmail Shell extension or Linux GmailFS utilities..
* Supports Multiple Gmail accounts in the same script .
* Supports all browsers.
* Total size is less than 100 KB.
Download Latest version
3. GSPACE

Gspace is the FON friendly site that provides FREE Online Storage to access your files everywhere.
Gspace turns the 2GB of your Gmail account into free online storage. With Gspace you can manage unlimited Gmail accounts to store all type of files within its simple, user friendly interface.
Listen your favourite stored music directly from your Gspace, view your collections of pictures and manage your Gdrive files as well.
Gspace works with Windows Os, Linux, and MAS OSX
Download (I think Gspace is no longer working)
Related Posts B
- Offline Gmail to browse gmail from computer by downloading the whole gmail
- Getting a Google Wave invitation – free ways and methods to get google wave account
- Download Youtube, Google Videos and other Videos Free
- Enter and Browse any Forum without registering – Hack
- Handy and best computer tip to join Video Files using Command Prompt – Hack
Remove Windows Genuine Advantage with WGA Notification 1.5.708.0 All in one
Recently, Microsoft has updates the latest WGA 1.5.708.0 tools to prevent Windows legit copy since the previous WGA tools has been crack by WGA software patcher. This latest WGA which consists of LegitCheckControl.dll and LegitCheckControl.inf that is installed to whoever that wants to download WGA-protected downloads and software from Microsoft Download Center. But i found a blog site already publish the solution to overcome or bypass the latest WGA 1.5.708.0.
The solution is WGA (Windows Genuine Advantages) Notification 1.5.708.0 All in one package tools where AIO package tools that consist crack tools to bypass the latest Windows Genuine Advantage 1.5.708 and a couple of useful utilities as below:

The AIO package has pack up all crack tools into one executable file with a nice graphical user interface. Using this AIO package, you can make your Windows become genuine from a non-genuine one. The Function of AIO tools like validate your Windows genuine status, changing your Windows product key with KEY PROVIDED, crack the LegitCheckControl.dll to allow Windows Update and crack the Microsoft Anti Piracy nag screen.
Note: Downloading and using AIO package is your own decision and risk. I do not take any responsibility if you get into trouble with this AIO.
[ Dowload Windows Genuine Advantage 1.5.708 All-In-One ]
The solution is WGA (Windows Genuine Advantages) Notification 1.5.708.0 All in one package tools where AIO package tools that consist crack tools to bypass the latest Windows Genuine Advantage 1.5.708 and a couple of useful utilities as below:
- MS Download Center Code
- Genuine Validation Status Tool
- RockXP_v4
- Windows XP KB905474-x86-1.5.540.0.exe
- Ms Anti_Piracy WGA nag screen
The AIO package has pack up all crack tools into one executable file with a nice graphical user interface. Using this AIO package, you can make your Windows become genuine from a non-genuine one. The Function of AIO tools like validate your Windows genuine status, changing your Windows product key with KEY PROVIDED, crack the LegitCheckControl.dll to allow Windows Update and crack the Microsoft Anti Piracy nag screen.
Note: Downloading and using AIO package is your own decision and risk. I do not take any responsibility if you get into trouble with this AIO.
[ Dowload Windows Genuine Advantage 1.5.708 All-In-One ]
Remove Windows Genuine Advantage Notifications Nag Screen
When you log on to a non-genuine copy of Windows XP, the following notification error message “This copy of Windows is not genuine” will pop-up on the logon process

Solution 1
Lauch Windows Task Manager.
End wgatray.exe process in Task Manager.
Restart Windows XP in Safe Mode.
Delete WgaTray.exe from c:\Windows\System32.
Delete WgaTray.exe from c:\Windows\System32\dllcache.
Lauch RegEdit.
Browse to the following location:
HKEY_LOCAL_MACHINE\SOFTWARE\Microsoft\
Windows NT\CurrentVersion\Winlogon\Notify
Delete the folder ‘WgaLogon’ and all its contents
Reboot Windows XP.
Note: With this method, you may be prompted to install WGA Notifications again which can still be unselected.
Solution 2
1-Launch Task manager
2-End process WGAtray.exe
3-Quickly restart in safe mode.
4-Click start, then Run. Type regedit and click ok.
5-Click HKEY_LOCAL_MACHINE
6-Click Software, microsoft, windowsNT, currentversion, winlogon, notify.
7-On the right hand side find folder WGAlogon and delete it and all of its components.
8-Restart in normal mode.
9-Go to c:\windows\system32 and delete WGAtray.exe file.
10-Next to it should be WGAlogon.dll, delete this too.
11-Delete from recycling bin and reboot.
This should have solved the problem but i advise switching your automatic updates to
“Notify me but dont automatically download or install them”. This should advise you if your computer tries to download WGA again.
Solution 3
For windows XP SP3 users try this method
1 Lauch RegEdit.
2 Browse to the following location:
HKEY_LOCAL_MACHINE\SOFTWARE\Microsoft\
Windows NT\CurrentVersion\Winlogon\Notify
3 Delete the folder ‘WgaLogon’ and all its contents
4 Reboot Windows XP.
Solution 4
Disabling and renaming the files ‘WgaLogon.dll’ and ‘WgaTray.exe’ in C:\WINDOWS\system32 folder by using the program Unlocker seems to get rid of all the nags/popups.
Solution 5
Another alternative suggest that three files are installed Windows XP System Folder for WGA:
\WINDOWS\system32\WgaLogon.dll
\WINDOWS\system32\WgaTray.exe
\WINDOWS\system32\LegitCheckControl.dll
The wgatray.exe process makes the check for genuine windows software. If WgaLogon.dll is denied execution right, that WinLogon is unable to call it to check on Windows validity and display notification package at boot, and since WgaLogon is also responsible for running and maintaining WgaTray.exe, no more tray popups either.
To change and disable the execute bit of WgaLogon.dll:
Turn off Simple File Sharing in Tools -> Folder Options -> View tab.
Right click WgaLogon.dll in Windows Explorer and open the Security Tab.
Click Advanced button.
Uncheck the Inherit box at the bottom.
Click the Copy button.
Click OK.
Go through each listed user/group and remove the “Read & Execute” permission for WgaLogon.dll, leaving the “Read” permission as-is.
Click OK to apply the permission changes.
Close the file properties dialog.
Restart the computer.
Turn “Use simple file sharing” on (optional).
When you log on to a non-genuine copy of Windows XP, the following notification error message “This copy of Windows is not genuine” will pop-up on the logon process
Solution 1
Lauch Windows Task Manager.
End wgatray.exe process in Task Manager.
Restart Windows XP in Safe Mode.
Delete WgaTray.exe from c:\Windows\System32.
Delete WgaTray.exe from c:\Windows\System32\dllcache.
Lauch RegEdit.
Browse to the following location:
HKEY_LOCAL_MACHINE\SOFTWARE\Microsoft\
Windows NT\CurrentVersion\Winlogon\Notify
Delete the folder ‘WgaLogon’ and all its contents
Reboot Windows XP.
Note: With this method, you may be prompted to install WGA Notifications again which can still be unselected.
Solution 2
1-Launch Task manager
2-End process WGAtray.exe
3-Quickly restart in safe mode.
4-Click start, then Run. Type regedit and click ok.
5-Click HKEY_LOCAL_MACHINE
6-Click Software, microsoft, windowsNT, currentversion, winlogon, notify.
7-On the right hand side find folder WGAlogon and delete it and all of its components.
8-Restart in normal mode.
9-Go to c:\windows\system32 and delete WGAtray.exe file.
10-Next to it should be WGAlogon.dll, delete this too.
11-Delete from recycling bin and reboot.
This should have solved the problem but i advise switching your automatic updates to
“Notify me but dont automatically download or install them”. This should advise you if your computer tries to download WGA again.
Solution 3
For windows XP SP3 users try this method
1 Lauch RegEdit.
2 Browse to the following location:
HKEY_LOCAL_MACHINE\SOFTWARE\Microsoft\
Windows NT\CurrentVersion\Winlogon\Notify
3 Delete the folder ‘WgaLogon’ and all its contents
4 Reboot Windows XP.
Solution 4
Disabling and renaming the files ‘WgaLogon.dll’ and ‘WgaTray.exe’ in C:\WINDOWS\system32 folder by using the program Unlocker seems to get rid of all the nags/popups.
Solution 5
Another alternative suggest that three files are installed Windows XP System Folder for WGA:
\WINDOWS\system32\WgaLogon.dll
\WINDOWS\system32\WgaTray.exe
\WINDOWS\system32\LegitCheckControl.dll
The wgatray.exe process makes the check for genuine windows software. If WgaLogon.dll is denied execution right, that WinLogon is unable to call it to check on Windows validity and display notification package at boot, and since WgaLogon is also responsible for running and maintaining WgaTray.exe, no more tray popups either.
To change and disable the execute bit of WgaLogon.dll:
Turn off Simple File Sharing in Tools -> Folder Options -> View tab.
Right click WgaLogon.dll in Windows Explorer and open the Security Tab.
Click Advanced button.
Uncheck the Inherit box at the bottom.
Click the Copy button.
Click OK.
Go through each listed user/group and remove the “Read & Execute” permission for WgaLogon.dll, leaving the “Read” permission as-is.
Click OK to apply the permission changes.
Close the file properties dialog.
Restart the computer.
Turn “Use simple file sharing” on (optional).
Subscribe to:
Comments (Atom)