Friday, February 4, 2011

Lost your Windows password? Here’s what you can do to get around

Due to the security features built into Windows XP, it is virtually impossible to get back into the system without the password.
You have several options to try and get around this problem.
If you have access to another user account with administrator rights, you can use that account to change the password of the account that is locked out. You can also use the default Administrator account that is built into Windows XP.
First you need to boot the system into Safe Mode.
  1. Restart your system.
  2. When you see the blue screen, press the ( F8 ) key about 3 times a second.
  3. You should get the Windows startup menu. Use the (Up or Down) arrow keys to highlight (SafeMode).
  4. Press (Enter) on (Safe Mode), then press (Enter) on (Windows XP).
  5. The system should boot to Safe Mode.
Once you are at the Account Log on Screen, click on the icon for the user account with administrator rights, or click on the icon for the administrators account.
Note: For Home the Administrator account isn’t normally shown & in Safe Mode you have to press Ctrl+Alt+Delete keys twice to show. For PRO you can do this in normal mode
When the system has booted to the desktop, use the following steps to change the accounts password.
  1. Click Start, Control Panel, Administrative Tools.
  2. Click Computer Management.
  3. Double click Local Users and Groups, double click the folder Users.
  4. Right click on the account name that is locked out, and click on Set Password.
  5. You may get a warning message about changing the password, simply click proceed.
  6. Leave the New Password box blank, also leave the Confirm Password box blank.
  7. Click OK, and OK again.
  8. Then close all Windows, reboot the system and try to log in.
There are also applications that can recover the password for you.
If the above information does not help in recovering the password, the only option left is to format the hard drive then reinstall Windows and the system software
How To Uninstall An Application That Has No Uninstall Program

If you want to uninstall an application that has no uninstall program and it is not listed in the Add/Remove applet of Control Panel (or that uninstall doesn't work), then just delete the directory/files.

  • Make a backup of the registry

  • Shutdown the application, if it is running (If WinNT+ check also for services)

  • Search the registry for any references to the directory where the application resides, and remove them

  • Search the registry for any references to the name of the application, and remove them

  • Start Regedit and drill down to :


  • [HKEY_CURRENT_USER \Software \]
    [HKEY_LOCAL_MACHINE \Software \]
    [HKEY_LOCAL_MACHINE \Software \Microsoft \Windows \CurrentVersion \SharedDLLs]


  • Rename the directory in which the application was installed in the first place

  • Reboot and if everything goes well, then delete the renamed directory

  • Use Explorer to to remove the entries from the Start Menu in either
    C:\Documents and Folders\All Users\Start Menu\Programs\ and/or
    C:\Documents and Folders\(your username)\Start Menu\Programs\
    If there is an entry in the Add/Remove list, start regedit go to:
    HKEY_LOCAL_MACHINE\SOFTWARE\Microsoft\Windows\CurrentVersion\Uninstall
    Locate the entry and delete it. If the app has a service, edit:
    HKEY_LOCAL_MACHINE\System\CurrentControlSet\Services
    and scroll down till you locate it. Then delete it. If this app starts automatically and there is no entry in the StartUp folder(s), then use Regedt32 to edit:
    HKEY_CURRENT_USER\Software\Microsoft\WindowsNT\CurrentVersion\Windows
    Aaron Stebner discribes another method in his Aaron Stebner's WebLog
    Also worth to check : http://support.microsoft.com/kb/314481 http://support.microsoft.com/kb/Q247501 http://support.microsoft.com/kb/Q247515 http://support.microsoft.com/kb/Q290301

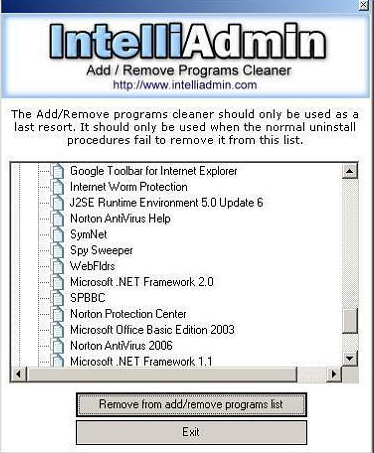
    Add Remove Program Cleaner 2 :This program allows you to clean up the Add/Remove programs list in the control panel. It should only be used to remove entries that are broken and cannot be removed by running the uninstall program.
    SparksSpace023
    Add-Remove-Program-Cleaner |Sys Req:Windows NT/2000/XP/2003 Server/Vista | Freeware | 940KB

    Disabling Windows Vista UAC

    There is an easy way to disable Windows Vista UAC (User Account Control), it will only take seconds.
    1. Click on the Start menu and click on the Control Panel
    2. From the Control Panel search box, type and search for "disable uac" (without quotes)
    3. Click on the "Turn on User Account Control (UAC) to make your computer more secure", then uncheck "Use User Account Control (UAC) to help protect your computer"
      Disable Windows Vista User Account Control (UAC)
    4. If you're done just click on the OK button, reboot you're computer when prompted

    How to turn off Low Disk Space warning in Windows XP ?

    Annoyed by the Low disk space warning that comes in the tray icon whenever your disk runs out of space ? Do you want to turn of the Low disk space warning ?
    • Open your registry editor by typing " REGEDIT " in the run prompt .
    • Navigate as follows : HKEY_CURRENT_USER\ Software\ Microsoft\ Windows\ CurrentVersion\ Policies\ Explorer.
    • Now Right Click in the right pane , Click New -> Dword and name it as NoLowDiskSpaceChecks. .
    • Double-click on NoLowDiskSpaceChecks, and enter the value as 1, and press OK.
    Thats it . From now on you wont get annoying Low disk space error .

    How to remove RAVMON Virus from your PC ? Show hidden files and folders not working ? Computer shuts down automatically ?


    Is your right click context menu showing some Chinese scripts ? Is your show hidden files and folders not working ? Is your command prompt , Registry Editor and task manager disabled ??

    If all these things are happening to your Computer , the reason is that it has got infected by a virus named " RAVMON " .What can this Virus do ??
    • Disables task manager , Registry Editor and Command prompt .
    • Right click menu shows some Chinese scripts as shown in the figure.
    • Computer shutdown automatically and slogs a lot.
    • Folder Options disappear
    • Show hidden files and folders Option won't work.
    With all these things not working , I can understand what can go with you !! I saw this thing on my friends PC . Then only I decided to write the solution for this.So how are you going to remove this ?

    Download it and remove the Virus.

    Download the RAVMON virus removal Tool
    Note : Wait for the page to load and then click start download


    One you download the tool , you can see the menu as shown in the figure.Click on the three of them.and press OK.If you are not infected with RAVMON then the tool automatically shows the error message.So download it and enjoy using your PC.

    Speedup Folder Browsing.

    You may have noticed that everytime you open my computer to browse folders that there is a slight delay. This is because Windows XP automatically searches for network files and printers everytime you open Windows Explorer. To fix this and to increase browsing significantly:

    1. Open My Computer
    2. Click on Tools menu
    3. Click on Folder Options
    4. Click on the View tab.
    5. Uncheck the Automatically search for network folders and printers check box
    6. Click Apply
    7. Click Ok
    8. Reboot your computer

    Save Google Presentations as (.PPT) Powerpoint Files

    The issue that concerns users the most when adopting trends of cloud computing is the compatibility of web applications with desktop sofwares. Google Docs today added a new feature to Google Presentations that will allow users to save Google Presentations as (.PPT) Powerpoint Files thus adding backward compatibility.

    To save a Google Presentation as a (.PPT) Powerpoint File open the File menu in Google Docs and click on the new option that says “Save as PPT”. This new feature will now allow you to edit your Google Presentation on Microsoft Powerpoint and vice versa so you can work on it anywhere, anytime even offline.

    How to remove Virus from USB Drives

    One of the ways by which a virus can infect your PC is through USB/Pen drives. Common viruses such as ’Ravmon’ , ‘New Folder.exe’, ‘Orkut is banned’ etc are spreading through USB drives. Most anti virus programs are unable to detect them and even if they do, in most cases they are unable to delete the file, only quarantine it. Here are the things which you can do if you want to remove such viruses from your USB Drive
    Whenever you plug a USB drive in your system, a window will appear similar to the one shown below
    USB
    Don’t click on Ok , just choose ‘Cancel’. Open the Command Prompt by typing ‘cmd‘ in the run box. In the command prompt type the drive letter: and press enter . Now type dir /w/a and press enter.
    This will display a list of the files in the pen drive. Check whether the following files are there or not
    • Autorun.inf
    • Ravmon.exe
    • New Folder.exe
    • svchost.exe
    • Heap41a
    • or any other exe file which may be suspicious.
    If any of the above files are there, then probably the USB drive is infected. In command prompt type attrib -r -a -s -h *.* and press enter. This will remove the Read Only, Archive, System and hidden file attribute from all the files. Now just delete the files using the command del filename. example del Ravmon.exe. Delete all the files that are suspicious. To be on a safer side, just scan the USB drive with an anti virus program to check whether it is free of virus or not. Now remove the drive and plug it again. In most of the cases, the real culprit turns out to be the “Autorun.inf” file which mostly gets executed when someone clicks Ok in the dialog window which appears above. Thus the infections can spread
    Security Tip
    Disable the Autoplay feature of USB drives. If you disable the Autoplay feature of USB drives, then there are lesser chances of the virus spreading. A tool which can perform such a function is Tweak UI. Download it from here install it.
    Tweak UI
    Run the program. Now you can disable the Autoplay feature of the removable drives as shown above. By following the above steps, you can keep your USB drives clean.
    Update: Tweak UI is a freeware software you can download it here: http://www.filehippo.com/download_tweakui/

    Disable USB Ports

    Here is a way to disable USB ports in an Active Directory Domain


    In Active Directory Users and Computers, open an existing GPO or create a new one and open it. Use the security settings of that GPO to specify which computers it affects.

    In that GPO, go to Computer Configuration – Windows Settings – Security Settings – File System and create a new entry (right-click File System and select Add File). Specify the location of USBSTOR.INF (usually SystemRoot%\Inf\USBSTOR.INF)
    Change the security settings of the new entry. The security settings that you specify here will be enforced on the USBSTOR.INF of every computer to which the GPO is applied. This process is not additive, which means that the previous security settings of USBSTOR.INF will be overwritten by the ones given in the GPO. It is therefore recommended to grant full control to SYSTEM and local administrators. But unlike in the default security settings of USBSTOR.INF, you should not grant any priviledges to Everybody. You do not need to explicitly deny access – just omit an entry for Everybody. Optionally, you can grant read access to a certain group. Members of this group will be able to use USB storage.

    Repeat the above two steps for USBSTOR.PNF.

    Download USBSTOR.ADM.

    Back in the GPO, right-click Administrative Templates under Computer Configuration and select Add/Remove Templates. Click Add and browse to the location of USBSTOR.ADM. Close the dialog.

    You should now have an additional entry called Services and Drivers in Administrative Templates. Click on it. If it is empty, select View from the menu and uncheck Show Policies Only. Click back on Services and Drivers in Administrative Templates. It should now show the USB Storage policy. Double click it, select Enabled and pick Disabled from the Startup Type drop down. Again, the policy must be enabled wheras Startup Type must be Disabled.
    Close the dialog as well as the GPO and boot/reboot one of your workstations. Make sure no USB strorage device is connected to that computer. Log on with administrative privileges and check the permissions of USBSTOR.INF and USBSTOR.PNF. Check the value of the HKEY_LOCAL_MACHINE\SYSTEM\CurrentControlSet\Services\UsbStor\Start. It should be 4. It is also ok if the UsbStor key doesn't exist at all.
    On the same workstation, log off and back on as a user that should not have access to USB storage. Connect a USB memory stick or a similar device. Nothing should happen. Remove the memory stick.

    Log on as a user that should have access to USB storage and execute net start usbstor in a command shell or at Start – Run before connecting the memory stick. The memory stick should initialized and mapped to a drive letter. If USBSTOR fails to start, it's probably because this is the first time a memory stick is plugged into the workstation in which case USBSTOR is not yet installed. Nevertheless, the memory stick should be initialized and mapped correctly but you need to reboot in order to reapply the administrative template such that USBSTOR is disabled again. Alternatively, you can disable it manually by downloading and double clicking USBSTOR.REG as well as executing net stop usbstor.

    Instruct the users with access to USB storage that they need to execute net start usbstor before they can connect a USB storage device.

    Increase Hard Disk speed in Windows

    If you like to increase/optimize your Hard Disk I/O - read/write speed without buying expensive software utilities to do that job or changing the HD, just follow next steps. With doing these steps you will increase Hard disk speed (depends of manufacture and specification, but its worth to try). The most speed improvement is visible with IDE drives; however there are reports that this tweak also does good for SCSI disks.

    In any case, it won't harm your system, so try it yourself and let me know what you find!

    Steps:

    1. Run SYSEDIT.EXE from the start & then Run command.
    2. Expand the system.ini file window.
    3. Scroll down almost to the end of the file untill you find a line called [386enh].
    4. Press Enter to make one blank line, and in that line type
    5. Irq14=4096 (note: This line IS CASE SENSITIVE)
    6. Click on the File menu, then choose Save.
    7. Close SYSEDIT and reboot your computer.
    8. Restart windows!

    The speed improvement will be noticed just after the system reboots, any system info. software can be used to check the improvement.

    How to Stop the Autorun PC Virus Infection ?

    The free Panda USB Vaccine allows users to vaccinate their PCs in order to disable Autorun completely so that no program from any USB/CD/DVD drive (regardless of whether they have been previously vaccinated or not) can auto-execute. This is a really helpful feature as there is no user friendly and easy way of completely disabling Autorun on a Windows PC.


    Panda USB Vaccine is a 100% free utility. Its tested under Windows 2000 SP4, Windows XP SP1-SP3, and Windows Vista SP0 and SP1.

    http://download.cnet.com/Panda-USB-Vaccine/3000-2239_4-10909938.html